Mercedes-Benz GLK-Class: Features
Cup holders
Important safety notes
![]() WARNING
WARNING
In order to help prevent spilling liquids on vehicle occupants and/or vehicle equipment, only use containers that fit into the cup holder. Use lids on open containers and do not fill containers to a height where the contents, especially hot liquids, could spill during braking, vehicle maneuvers, or in an accident. Liquids spilled on vehicle occupants may cause serious personal injury. Liquids spilled on vehicle equipment may cause damage not covered by the Mercedes-Benz Limited Warranty.
When not in use, keep the cup holder closed. An open cup holder may cause injury to you or others when contacted during braking, vehicle maneuvers, or in an accident.
Keep in mind that objects placed in the cup holder may come loose during braking, vehicle maneuvers, or in an accident and be thrown around in the vehicle interior. Objects thrown around in the vehicle interior may cause an accident and/or serious personal injury.
Cup holder in the front-compartment center console
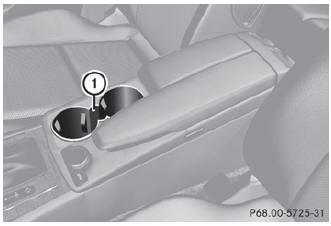
1 Cup holders
Cup holder in the rear seat armrest
![]() Do not sit on or support your body weight on the rear seat armrest when it
is folded down, as you could otherwise damage it.
Do not sit on or support your body weight on the rear seat armrest when it
is folded down, as you could otherwise damage it.
![]() Close the cup holder before folding the rear seat armrest up. Otherwise, the
cup holder could be damaged.
Close the cup holder before folding the rear seat armrest up. Otherwise, the
cup holder could be damaged.
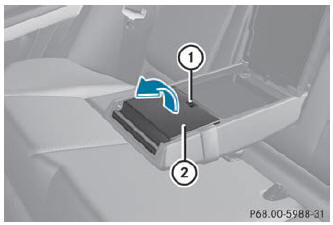
- Fold down the rear seat armrest.
- To open: raise the rear seat armrest cover.
- Press release catch 1. Cup holder 2 folds out forwards.
- Swing the rear seat armrest cover back down, if necessary.
- To close: raise the rear seat armrest cover. Swing cup holder 2 back until it engages.
Sun visors
Overview of sun visors
![]() WARNING
WARNING
Do not use the vanity mirror while driving. Keep the vanity mirrors in the sun visors closed while the vehicle is in motion. Reflected glare can endanger you and others.
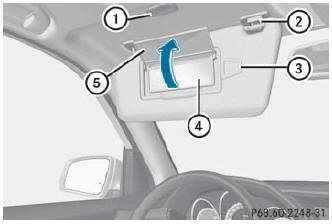
- Mirror light
- Bracket
- etaining clip, e.g. for a car park ticket
- Vanity mirror
- Mirror cover
Vanity mirror in the sun visor
Mirror light 1 only functions if the sun visor is clipped into retainer 2 and mirror cover 5 has been folded up.
Glare from the side
- Fold down the sun visor.
- Pull the sun visor out of retainer 2.
- Swing the sun visor to the side.
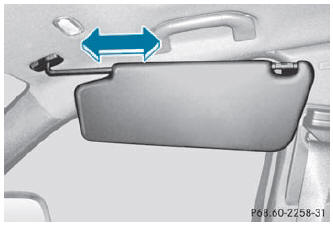
- Pull or push the sun visor in the direction of the arrow.
Ashtray
Ashtray in the front-compartment center console
![]() You can remove the ashtray insert and use the resulting compartment for stowage.
You can remove the ashtray insert and use the resulting compartment for stowage.
![]() The stowage space under the ashtray is not heat resistant. Before placing lit
cigarettes in the ashtray, make sure that the ashtray is properly engaged. Otherwise,
the stowage space could be damaged.
The stowage space under the ashtray is not heat resistant. Before placing lit
cigarettes in the ashtray, make sure that the ashtray is properly engaged. Otherwise,
the stowage space could be damaged.
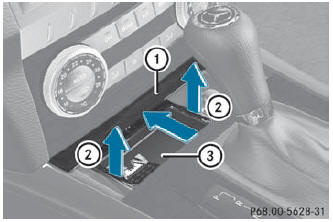
- To open: slide cover 1 forwards until it engages.
- To remove insert: hold insert 3 by the ribbing at the sides and lift it up 2 and out.
- To re-install the insert: press insert 3 into the holder until it engages.
- To close: press cover 1 briefly at the front. The cover moves back.
Ashtray in the rear-compartment center console
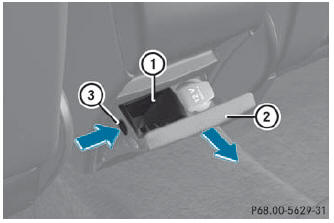
- To open: pull cover 2 out by its top edge.
- To remove the insert: press release button 3 and lift the insert up and out.
- To install the insert: install insert 1 from above into the holder and press down into the holder until it engages.
Cigarette lighter
![]() WARNING
WARNING
When leaving the vehicle, always remove the SmartKey from the ignition lock. Always take the SmartKey with you and lock the vehicle. Do not leave children unattended in the vehicle, even if they are secured in a child restraint system, or with access to an unlocked vehicle. A child's unsupervised access to a vehicle could result in an accident and/or serious personal injury. The children could:
- injure themselves on parts of the vehicle
- be seriously or fatally injured through excessive exposure to extreme heat or cold
- injure themselves or cause an accident with vehicle equipment that can be operated even if the SmartKey is removed from the ignition lock or removed from the vehicle, such as seat adjustment, steering wheel adjustment, or the memory function
If children open a door, they could injure other persons or get out of the vehicle and injure themselves or be injured by following traffic.
Do not expose the child restraint system to direct sunlight. The child restraint system's metal parts, for example, could become very hot, and the child could be burned on these parts.
![]() WARNING
WARNING
Never touch the heating element or sides of the lighter; they are extremely hot. Hold the knob only.
Make sure any children traveling with you do not injure themselves or start a fire with the hot cigarette lighter.
- Turn the SmartKey to position 2 in the ignition lock.
- To open: slide cover 1 forwards until it engages.
- Press in cigarette lighter 2. Cigarette lighter 2 will pop out automatically when the heating element is red-hot.
- To close: press cover 1 briefly at the front. The cover moves back.
12 V sockets
Points to observe before use
The sockets can be used for accessories, e.g. lamps or mobile phone chargers with a maximum current draw of 180 W (15 A).
If you use the sockets for long periods when the engine is switched off, the battery may discharge.
- Turn the SmartKey to position 1 in the ignition lock.
![]() An emergency cut-out ensures that the on-board voltage does not drop too low.
If the on-board voltage is too low, the power to the sockets is automatically cut.
This ensures that there is sufficient power to start the engine.
An emergency cut-out ensures that the on-board voltage does not drop too low.
If the on-board voltage is too low, the power to the sockets is automatically cut.
This ensures that there is sufficient power to start the engine.
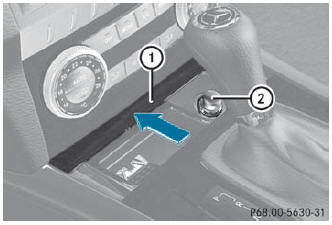
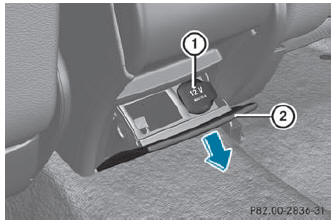
Socket in the front-compartment center console
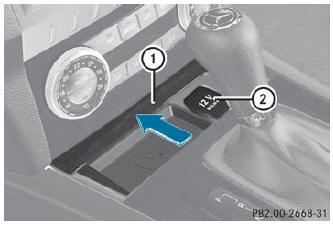
- To open: slide cover 1 forwards until it engages.
- Lift up the cover of socket 2.
- To close: press cover 1 briefly at the front. The cover moves back.
Socket in the rear-compartment center console
- Pull cover 2 out by its top edge. X Lift up the cover of socket 1.
Socket in the cargo compartment
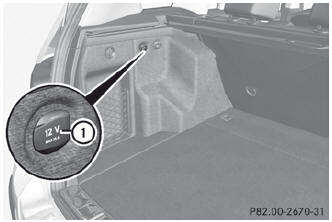
X Lift up the cover of socket :.
115 V power socket
![]() WARNING
WARNING
The 115V AC socket operates at high voltage. Use the 115V AC socket in the vehicle with the same caution and prudence that you exercise when using power outlets at home. Keep any fluids away from the 115V AC socket. Do not clean the socket with fluids or tapered objects. Keep the 115V AC socket cover in the closed position, when not in use. Otherwise, you could suffer an electric shock and be seriously or even fatally injured.
![]() WARNING
WARNING
Any device that you connect must have a suitable plug and meet U.S. standards. Never pull at a cable to disconnect a plug from a 115 V AC power socket. Never use a damaged connection cable. The 115 V AC power socket must never be connected to another 115 V AC power source. Do not use a converter with an earthed plug for the 115 V AC power socket. This could cause serious injury to you and/or other people.
![]() WARNING
WARNING
If the 115V AC socket is damaged or torn out of the trim, do not use or touch the 115V AC socket. Using a 115V AC socket that is damaged or torn out of the trim could cause serious personal injury to you and/or others.
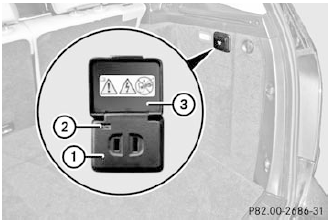
115 V socket : provides an alternating voltage of 115 V, so that small electronic devices can be connected. These devices, such as games consoles, chargers and laptops, together should not consume more than a maximum of 150 W.
Requirements for operation of these devices:
- the plug of the electronic device must be inserted fully into 115 V power socket 1.
- the maximum wattage of the device to be connected must not exceed 150 W.
- the on-board power supply is within a permissible volt range.
- the 12 V sockets in the rear and the cargo compartment are operational ().
- Open flap 3.
- Switch the ignition on.
- Insert the plug of the electronic device into 115 V power socket 1. Indicator lamp 2 lights up. If indicator lamp 2 does not light up, consult the section on malfunctions.
- To turn off: disconnect the plug from 115 V power socket 1. Ensure that you do not pull on the cord.
- Close flap 3.
Possible causes of malfunction:
- the on-board power supply is not within a permissible volt range.
- the temperature of the DC/AC converter is temporarily too high.
- some small electronic devices have a constant nominal power of less than 150 W, but a very high inrush current. These devices will not work. If you connect such a device, 115 V power socket 1 will not supply it with power.
If indicator lamp 2 still does not light up, contact a specialist workshop, e.g. an authorized Mercedes-Benz Center.
mbrace
Important safety notes
![]() A license agreement must exist in order to activate the mbrace service. Ensure
that your system is activated and ready for use, and press the
A license agreement must exist in order to activate the mbrace service. Ensure
that your system is activated and ready for use, and press the
 MB Info call button to register. If
any of the steps mentioned is not carried out, the system may not be activated.
MB Info call button to register. If
any of the steps mentioned is not carried out, the system may not be activated.
If you have questions about the activation, contact one of the following telephone assistance services:
USA: Mercedes-Benz Customer
Assistance Center under
1-800-FOR-MERCedes
(1-800-367-6372) or 1-888-990-9007
Canada: Customer Service at
1-888-923-8367
Shortly after successfully registering with the mbrace service, a user ID and password will be sent to you by post. You can use this password to log in to the mbrace section under "Owners Online" at http:// www.mbusa.com.
The mbrace system is available if:
- it has been activated and is operational.
- the corresponding mobile phone network is available for transmitting data to the Customer Center.
- a service subscription is available.
- the starter battery is sufficiently charged.
![]() Determining the location of the vehicle on a map is only possible if there
is sufficient GPS reception and the vehicle position can be forwarded to the Customer
Center.
Determining the location of the vehicle on a map is only possible if there
is sufficient GPS reception and the vehicle position can be forwarded to the Customer
Center.
The mbrace system
The mbrace system provides different services, e.g.:
- automatic and manual emergency call
- Roadside Assistance call
- MB Info call
To adjust the volume during an mbrace call, proceed as follows:
- Press the
 or
or
 button on the multifunction steering
wheel.
button on the multifunction steering
wheel.
or
- Use the volume controller of the audio system.
You can find further information and a description of all available features under "Owners Online" at http://www.mbusa.com27.
System self-test
After you have switched on the ignition, the system carries out a self-diagnosis.
![]() WARNING
WARNING
A malfunction in the system has been detected if one of the following conditions occurs:
- the indicator lamp in the SOS button does not light up during the system self-diagnosis.
- the indicator lamp in the
 Roadside Assistance button does not light up during the system self-diagnosis.
 - The indicator lamp in the
 information button does not light up during self-diagnosis of the system.
 - the indicator lamp in the SOS button,
Roadside Assistance button or
information button continues to
be lit red after the system self-diagnosis.
- The Tele Aid Inoperative or Tele Aid Not Activated message appears in the multifunction display after the system selftest.
If a malfunction is indicated as outlined above, the system may not operate as expected. In the event of an emergency, assistance must be summoned by other means.
Have the system checked at the nearest authorized Mercedes-Benz Center or contact the following service hotlines:
- USA: Mercedes-Benz Customer Assistance Center under
1-800-FOR-MERCedes(1-800-367-6372) or 1-888-990-9007 - Canada: Customer Service at 1-888-923-8367
Emergency call
Important safety notes
![]() A license agreement must exist in order to activate the mbrace service. Ensure
that your system is activated and ready for use, and press the
A license agreement must exist in order to activate the mbrace service. Ensure
that your system is activated and ready for use, and press the
 MB Info call button to register. If
any of the steps mentioned is not carried out, the system may not be activated.
MB Info call button to register. If
any of the steps mentioned is not carried out, the system may not be activated.
If you have questions about the activation, contact one of the following telephone assistance services:
USA: Mercedes-Benz Customer Assistance Center under
1-800-FOR-MERCedes (1-800-367-6372) or 1-888-990-9007
Canada: Customer Service at 1-888-923-8367
An emergency call is dialed automatically if an air bag or Emergency Tensioning Device is triggered.
![]() An mbrace emergency call that has been initiated automatically cannot be terminated
by the customer.
An mbrace emergency call that has been initiated automatically cannot be terminated
by the customer.
An emergency call can also be initiated manually.
As soon as the emergency call has been initiated, the indicator lamp in the SOS button flashes. The Connecting Call message appears on the multifunction display. The audio output is muted.
Once a connection has been established, the Call Connected message appears in the multifunction display.
All important information on the emergency is transmitted, for example:
- current location of the vehicle (as determined by the GPS system)
- vehicle identification number
- information on the type of emergency Shortly after the emergency call has been initiated, a voice connection is automatically established between the Mercedes-Benz Customer Assistance Center and the vehicle occupants. If the vehicle occupants respond, the Mercedes-Benz Customer Assistance Center attempts to get more information on the emergency.
![]() If no vehicle occupant answers, an ambulance is immediately sent to the vehicle.
If no vehicle occupant answers, an ambulance is immediately sent to the vehicle.
![]() WARNING
WARNING
If the indicator lamp in the SOS button is flashing continuously and no voice connection to the Mercedes-Benz Customer Assistance Center was established, then the mbrace system could not initiate an emergency call (e.g. the relevant cellular phone network is not available).
The message Call Failed appears in the multifunction display for approximately 10 seconds.
Should this occur, assistance must be summoned by other means.
Making an emergency call
- To initiate an emergency call manually: press cover 1 briefly to open it.
- Press SOS button 2 briefly. The indicator lamp in SOS button 2 flashes until the emergency call is concluded.
- Wait for a voice connection to the Mercedes-Benz Customer Assistance Center.
- After the emergency call is ended, close cover 1.
![]() WARNING
WARNING
If you feel in any way in jeopardy when in the vehicle (e.g. smoke or fire in the vehicle, vehicle in a dangerous road location), please do not wait for voice contact after you have pressed the SOS button. Carefully leave the vehicle and move to a safe location. The Mercedes-Benz Customer Assistance Center will automatically contact local emergency officials with the vehicle's approximate location if they receive an automatic SOS signal and cannot make voice contact with the vehicle occupants.
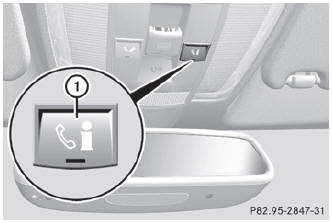
Roadside Assistance button
X Press and hold Roadside Assistance button 1 for more than two seconds. This initiates a call to the Mercedes-Benz Customer Assistance Center. The indicator lamp in Roadside Assistance button 1 flashes while the call is active. The Connecting Call message appears in the multifunction display. The audio output is muted.
If a connection can be established, the Call Connected message appears in the multifunction display.
If a cellular phone network is available and there is sufficient GPS reception, the mbrace system transmits data to the Mercedes-Benz Customer Assistance Center, for example:
- current location of the vehicle
- vehicle identification number
![]() The display of the audio system or COMAND shows that an mbrace call is active.
During the call, you can change to the navigation menu by pressing the NAVI button
on COMAND, for example. Voice output is not available.
The display of the audio system or COMAND shows that an mbrace call is active.
During the call, you can change to the navigation menu by pressing the NAVI button
on COMAND, for example. Voice output is not available.
A voice connection is established between the Mercedes-Benz Customer Assistance Center and the vehicle occupants.
- Describe the type of assistance needed.
The Mercedes-Benz Customer Assistance Center either sends a qualified Mercedes- Benz technician or organizes for your vehicle to be transported to the nearest authorized Mercedes-Benz Center. You may be charged for services such as repair work and/or towing. Further details are available in your mbrace manual.
![]() The mbrace system failed to initiate a Roadside Assistance call if:
The mbrace system failed to initiate a Roadside Assistance call if:
- the indicator lamp in Roadside Assistance button 1 is flashing continuously.
- no voice connection to the Mercedes- Benz Customer Assistance Center was established.
This may be because the corresponding mobile phone network is not available.
The Call Failed message appears in the multifunction display.
- To end a call: press the ~ button on the multifunction steering wheel.
or
- Press the corresponding button for ending a phone call on the audio system or on COMAND.
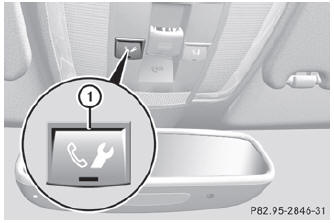
MB Info call button
- Press and hold MB Info call button 1 for more than two seconds. This initiates a call to the Mercedes-Benz Customer Assistance Center. The indicator lamp in MB Info call button 1 flashes while the connection is being established. The Connecting Call message appears in the multifunction display. The audio output is muted.
If a connection can be established, the Call Connected message appears in the multifunction display.
If a cellular phone network is available and there is sufficient GPS reception, the mbrace system transmits data to the Mercedes-Benz Customer Assistance Center, for example:
- current location of the vehicle
- vehicle identification number
![]() The display of the audio system or COMAND shows that an mbrace call is active.
During the call, you can change to the navigation menu by pressing the NAVI button
on COMAND, for example. Voice output is not available.
The display of the audio system or COMAND shows that an mbrace call is active.
During the call, you can change to the navigation menu by pressing the NAVI button
on COMAND, for example. Voice output is not available.
A voice connection is established between the Mercedes-Benz Customer Assistance Center and the vehicle occupants. You can obtain information on how to operate your vehicle's systems, on the location of the nearest authorized Mercedes-Benz Center, and on further products and services offered by Mercedes-Benz USA.
Further details on the mbrace system can be found under http://www.mbusa.com28. Log in under "Owners Online".
![]() The mbrace system failed to initiate an MB Info call if:
The mbrace system failed to initiate an MB Info call if:
Rthe indicator lamp in MB Info call button 1 is flashing continuously.
Rno voice connection to the Mercedes- Benz Customer Assistance Center was established.
This may be because the corresponding mobile phone network is not available.
The Call Failed message appears in the multifunction display.
- To end a call: press the
 button on the multifunction steering wheel.
or
- Press the corresponding button for ending a phone call on the audio system or on COMAND.
Call priority
When service calls are active, e.g. Roadside Assistance or MB Info calls, an emergency call can still be initiated. In this case, an emergency call will take priority and override all other active calls.
The indicator lamp of the respective button flashes until the call is ended.
An emergency call can only be terminated by the Mercedes- Benz Customer Assistance
Center. All other calls can be ended by pressing the
button on the multifunction steering
wheel or the corresponding button for ending a telephone call on the audio system
or on COMAND.
![]() If an mbrace call is initiated, audio output is muted. The mobile phone is
no longer connected to COMAND. However, if you want to use your mobile phone, we
recommend that you do this only when the vehicle is stationary and in a safe location.
If an mbrace call is initiated, audio output is muted. The mobile phone is
no longer connected to COMAND. However, if you want to use your mobile phone, we
recommend that you do this only when the vehicle is stationary and in a safe location.
Downloading destinations in COMAND
![]() Information on the components and operating principles of COMAND can be found
in the separate COMAND operating instructions.
Information on the components and operating principles of COMAND can be found
in the separate COMAND operating instructions.
![]() You can only use the Destination Download function if the vehicle is equipped
with a navigation system.
You can only use the Destination Download function if the vehicle is equipped
with a navigation system.
Destination Download gives you access to a database with over 15 million points of interest (POIs)/important destinations that can be downloaded onto the navigation system of your vehicle. If you know the destination, you can download the address or obtain the location of points of interest (POIs)/important destinations in the surrounding area.
You are prompted to confirm route guidance to the address entered.
The system calculates the route and subsequently starts the route guidance with the address entered.
![]() If you select No, the address can be stored in the address book.
If you select No, the address can be stored in the address book.
![]() The Destination Download function is available if the corresponding mobile
phone network is available and data transfer is possible.
The Destination Download function is available if the corresponding mobile
phone network is available and data transfer is possible.
Route Assistance
This service is part of the mbrace PLUS Package and cannot be purchased separately.
![]() You can also use the Route Assistance function if your vehicle is not equipped
with a navigation system.
You can also use the Route Assistance function if your vehicle is not equipped
with a navigation system.
Within the framework of this service, you receive a professional and reliable form of navigation support without having to leave your vehicle.
The customer service representative determines a suitable driving route based on your current vehicle position and the desired destination and guides you live through the current sections of the route.
Search & Send
"Search & Send" is a destination entry service. You can find further information on "Search & Send" in the separate COMAND operating instructions.
Vehicle remote opening
If you have unintentionally locked your vehicle (e.g. the SmartKey is still in the vehicle) and a replacement SmartKey is not available, the vehicle can be opened by a Mercedes-Benz Customer Assistance Center.
The vehicle can be opened remotely up to four days after the ignition was last switched off.
- Contact the following service hotlines:
USA: Mercedes-Benz Customer Assistance Center under 1-800-FOR-MERCedes( 1-800-367-6372) or 1-888-990-9007
Canada: Customer Service at 1-888-923-8367
You will be asked for your password.
- Return to your vehicle at the time agreed upon with the Mercedes-Benz Customer Assistance Center.
- Pull the tailgate handle for at least 20 seconds until the indicator lamp in the SOS button () flashes.
The Connecting Call message appears on the multifunction display.
Alternatively, the vehicle can also be opened via the Internet or an iPhone in the "Owners Online" section using your ID number and password.
![]() Vehicle remote unlocking is only possible if the corresponding mobile phone
network is accessible.
Vehicle remote unlocking is only possible if the corresponding mobile phone
network is accessible.
The SOS button flashes and the Connecting Call message appears in the multifunction display to confirm that the command for vehicle remote unlocking has been received.
If you pull the tailgate handle for more than 20 seconds before receiving authorization for remote unlocking from the Mercedes- Benz Customer Assistance Center, you must wait 15 minutes before you can pull the tailgate handle again.
Vehicle remote closing
If you forget to lock your vehicle but are no longer in the vicinity of the vehicle, it can be locked for you by the Mercedes-Benz Customer Assistance Center.
The vehicle can be locked remotely up to four days after the ignition was last switched off.
- Contact the following service hotlines:
USA: Mercedes-Benz Customer Assistance Center under 1-800-FORMERCedes( 1-800-367-6372) or 1-888-990-9007
Canada: Customer Service at 1-888-923-8367
You will be asked for your PIN. The next time you are in your vehicle and switch on the ignition, the Tele Aid Doors locked by remote control message appears in the multifunction display.
Alternatively, the vehicle can also be locked via the Internet or an iPhone in the "Owners Online" section using your ID number and password.
![]() The vehicle valet locking feature is available when the relevant mobile phone
network is available and data connection is possible.
The vehicle valet locking feature is available when the relevant mobile phone
network is available and data connection is possible.
Service for recovering a stolen vehicle
If your vehicle has been stolen:
- Notify the police. The police will issue a numbered incident report.
- This number will be forwarded to the Mercedes-Benz Customer Assistance Center together with your PIN. The Mercedes-Benz Customer Assistance Center then attempts to locate the mbrace system. The Mercedes-Benz Customer Assistance Center contacts you and the local law enforcement agency if the vehicle is located. However, only the law enforcement agency is informed of the location of the vehicle.
![]() If the anti-theft alarm system is active for longer than 30 seconds, mbrace
automatically informs the Mercedes-Benz Customer Assistance Center.
If the anti-theft alarm system is active for longer than 30 seconds, mbrace
automatically informs the Mercedes-Benz Customer Assistance Center.
Garage door opener
Important safety notes
The HomeLink® garage door opener integrated in the rear-view mirror allows you to operate up to three different door and gate systems.
![]() Certain garage door drives are incompatible with the integrated garage door
opener. If you have difficulty programming the integrated garage door opener, contact
an authorized Mercedes- Benz Center or call one of the following telephone hotlines:
Certain garage door drives are incompatible with the integrated garage door
opener. If you have difficulty programming the integrated garage door opener, contact
an authorized Mercedes- Benz Center or call one of the following telephone hotlines:
USA: Mercedes-Benz Customer Assistance Center at 1-800-FOR-MERCedes
Canada: Customer Service at 1-800-387-0100
![]() WARNING
WARNING
Before programming the integrated remote control to a garage door opener or gate operator, make sure people and objects are out of the way of the device to prevent potential harm or damage. When programming a garage door opener, the door moves up or down. When programming a gate operator, the gate opens or closes.
Do not use the integrated remote control with any garage door opener that lacks safety stop and reverse features as required by U.S. federal safety standards (this includes any garage door opener model manufactured before April 1, 1982). A garage door that cannot detect an object - signaling the door to stop and reverse - does not meet current U.S. federal safety standards.
When programming a garage door opener, park vehicle outside the garage.
Do not run the engine while programming the integrated remote control. Inhalation of exhaust gas is hazardous to your health. All exhaust gas contains carbon monoxide (CO), and inhaling it can cause unconsciousness and possible death. All exhaust gas contains carbon monoxide (CO), and inhaling it can cause unconsciousness and possible death.
![]() USA only:
USA only:
This device complies with part 15 of the FCC Rules. Operation is subject to the following two conditions:
1. This device may not cause harmful interference, and
2. this device must accept any interference received, including interference that may cause undesired operation. Any unauthorized modification to this device could void the user's authority to operate the equipment.
FCC ID: CB2HMIHL4
![]() Canada only:
Canada only:
This device complies with RSS-210 of Industry Canada. Operation is subject to the following two conditions:
1. This device may not cause interference, and
2. this device must accept any interference received, including interference that may cause undesired operation of the device.
Any unauthorized modification to this device could void the user's authority to operate the equipment.
IC: 279B-HMIHL4
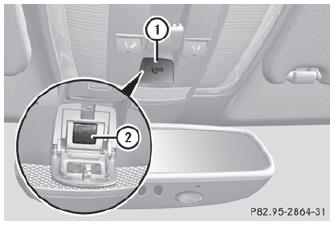
Programming the integrated garage door opener on the rear-view mirror
Programming
![]() WARNING
WARNING
Only press the transmitter button on the integrated remote control if there are no persons or objects present within the sweep of the garage door. People could otherwise be injured by the movement of the door.
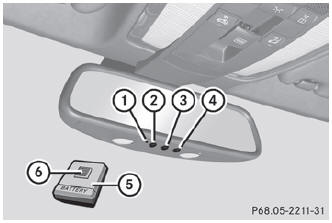
Integrated remote control in the rear-view mirror Garage door remote control 5 is not part of the garage door opener.
![]() To achieve the best result, insert new batteries in garage door remote control
5 of your garage door drive before programming.
To achieve the best result, insert new batteries in garage door remote control
5 of your garage door drive before programming.
- Erase the memory of the integrated remote control () before programming it for the first time.
- Turn the SmartKey to position 2 in the ignition lock.
- Press and hold one of transmitter buttons 2 to 4 on the integrated remote control.
After a short time, indicator lamp 1 will start flashing. It flashes approximately once per second.
![]() Indicator lamp 1 flashes immediately the first time that the transmitter button
is programmed. If this transmitter button has already been programmed, indicator
lamp 1 will only start flashing at a rate of once a second after 20 seconds have
elapsed.
Indicator lamp 1 flashes immediately the first time that the transmitter button
is programmed. If this transmitter button has already been programmed, indicator
lamp 1 will only start flashing at a rate of once a second after 20 seconds have
elapsed.
- Continue to hold the transmitter button.
- Point transmitter button 6 of garage door remote control 5 towards the transmitter buttons on the rear-view mirror at a distance of 5 to 20 cm.
- Point transmitter button 6 of garage door remote control 5 towards the transmitter buttons on the rear-view mirror at a distance of 2 to 12 inches (5 to 30 cm).
![]() The distance between garage door remote control 5 and the integrated garage
door opener depends on the system of the garage door drive. You might require several
attempts. You should test every position for at least 20 seconds before trying another
position.
The distance between garage door remote control 5 and the integrated garage
door opener depends on the system of the garage door drive. You might require several
attempts. You should test every position for at least 20 seconds before trying another
position.
- Keep transmitter button 6 on garage door remote control 5 pressed until indicator lamp 1 starts to flash rapidly. The programming has been successful if indicator lamp 1 flashes rapidly.
- Release transmitter buttons 2, 3 or 4 on the integrated remote control and transmitter button 6 on the garage door remote control.
If indicator lamp 1 goes out after approximately 90 seconds and has not flashed rapidly:
- Release transmitter buttons 2, 3 or 4 on the integrated remote control and transmitter button 6 on the garage door remote control.
- Repeat the programming procedure. When doing so, vary the distance between the garage door's remote control and the transmitter buttons in the rear-view mirror.
![]() If the garage door system works with a rolling code, you must synchronize the
remote control integrated in the rear-view mirror with the garage door system receiver
after programming.
If the garage door system works with a rolling code, you must synchronize the
remote control integrated in the rear-view mirror with the garage door system receiver
after programming.
You will find further information in the garage door opening system's operating instructions, e.g. the sections on "Synchronizing the transmitter" or "Registering a new transmitter". You can also call the hotline mentioned above.
Notes on programming the remote control
Canadian radio frequency laws require a "break" (or interruption) of the transmission signals after broadcasting for a few seconds. Therefore, these signals may not last long enough for the integrated remote control to recognize the signal during programming. Comparable with Canadian law, some U.S. garage door openers also have a built-in "interruption".
If you live in Canada or have difficulties programming the garage door opener (regardless of where you live) when using the programming steps (see above), proceed as follows:
- Press transmitter button (2, 3 or 4) and hold it down during the following steps until the setup has been completed successfully.
- At the same time, press transmitter button 6 of the garage door remote control for two seconds, then release it for two seconds, then press it again for two seconds.
- Repeat this sequence on transmitter button 6 of the garage door remote control until the frequency signal has been saved.
- If the setup procedure is successful, indicator lamp 1 flashes once slowly and goes out after a few seconds.
- Continue with the other programming steps (see above).
Problems when programming
If you have problems when programming the integrated remote control, please note the following:
- check the transmitter frequency of garage door remote control 5 (which can usually be found on the rear of the remote control). The integrated remote control is compatible with devices that operate at frequencies between 280 and 390 MHz.
- replace the batteries in garage door remote control 5. This increases the likelihood of garage door remote control 5 sending a strong and precise signal to the integrated remote control in the rear-view mirror.
- when programming, hold garage door remote control 5 at varying distances and angles from the transmitter button which you are programming. Try different angles at a distance between 2 and 12 inches (5 to 30 cm) or the same angle at varying distances.
- if there is another garage door remote control for the same garage door drive, perform the programming steps again using that remote control. Before performing these steps, make sure that new batteries have been inserted in the garage door remote control.
- align the antenna cable of the garage door opener unit. This can improve signal reception/transmission.
Opening/closing the garage door
Once programmed, the integrated remote control will assume the function of the garage door system's remote control. Please also read the operating instructions for the garage door system.
X Turn the SmartKey to position 2 in the ignition lock.
X Press transmitter button 2, 3 or 4 in the overhead control panel that you have programmed to operate the garage door. Garage door system with fixed code: indicator lamp 1 lights up continuously.
Garage door system with rolling code: indicator lamp 1 flashes briefly and then lights up for approximately two seconds. This is repeated for up to 20 seconds.
![]() The transmitter will transmit a signal for as long as the transmitter button
is being pressed. The transmission will be halted after a maximum of 20 seconds
and indicator lamp 1 will flash. Press the transmitter button again, if necessary.
The transmitter will transmit a signal for as long as the transmitter button
is being pressed. The transmission will be halted after a maximum of 20 seconds
and indicator lamp 1 will flash. Press the transmitter button again, if necessary.
Clearing the memory of the integrated garage door opener on the rear-view mirror
X Turn the SmartKey to position 2 in the ignition lock.
X Press and hold transmitter buttons 2 and 4 for approximately 20 seconds until indicator lamp 1 flashes rapidly. The memory is cleared.
![]() You should clear the remote control memory before selling the vehicle.
You should clear the remote control memory before selling the vehicle.
Frequencies for the garage door opener
The radio type approval number and the frequency range for the garage door opener can be found on the Internet at: http://www.mercedes-benz.de/betriebsanleitung.
Compass
Calling up the compass
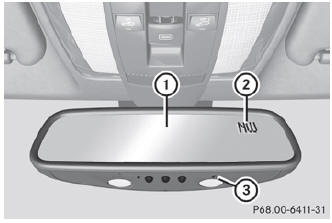
To obtain a correct display in rear-view mirror 1, the compass must be calibrated and the magnetic field zone must be set.
Setting the compass
- Determine your position using the following zone maps.
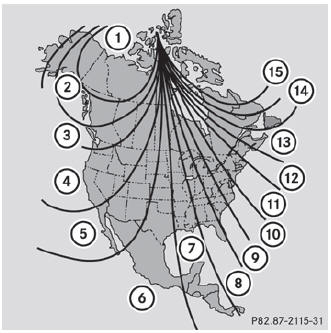
North America zone map
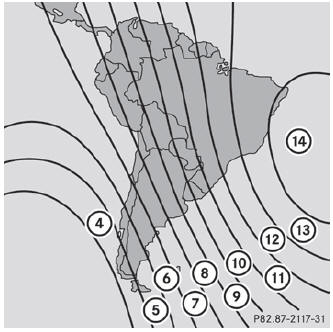
South America zone map
- Press a round pin into opening 3() for approximately three seconds. The currently selected zone appears in compass display 2().
- To select the zone: press a round pin into opening 3() repeatedly until the desired zone is selected. The zone has been selected when compass display 2() shows the heading. This takes a few seconds.
Calibrating the compass
- Make sure that there is sufficient space for you to drive in a circle without impeding the remaining traffic.
In order to calibrate the compass correctly, observe the following points:
- calibrate the compass in the open and not in the vicinity of steel constructions or highvoltage transmission lines.
- switch off electrical consumers, for example, the climate control, windshield wipers or rear window defroster.
- close all doors and the tailgate.
- Switch the ignition on.
- Press a round pin into opening 3() for approximately six seconds until the C symbol appears in compass display 2().
- Drive a full circle at approximately 3 mph (5 km/h) to 6 mph (10 km/h). Once the calibration has been successfully completed, the current direction appears in compass display 2().
Floormat on the driver's side
![]() WARNING
WARNING
Whenever you are using a floormat, make sure there is enough clearance and that the floormat is securely fastened.
The floormat should always be securely fastened using the fastening equipment.
Before driving off, check that the floormat is securely in place and adjust it if necessary. A loose floormat could slip and hinder proper functioning of the pedals.
Do not place several floormats on top of each other as this may impair pedal movement.
- Slide the seat backwards.
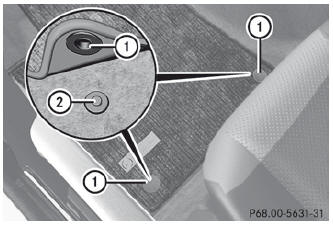
- To install: place the floormat in the footwell.
- Press studs 1 onto retainers 2.
- To remove: pull the floormat off retainers 2.
- Remove the floormat.
 Stowage areas
See also:
California proposition 65 warning
Engine exhaust, some of its constituents,
and certain vehicle components
contain or emit chemicals known to the
State of California to cause cancer and
birth defects or other reproductive
harm. In addition, certain fluids contained
in ...
Immobilizer
FCC WARNING
Changes or modifications not expressly
approved by the party responsible
for compliance could void
the user’s authority to operate the
equipment.
The immobilizer system is designed to
prevent an unauthorized person from ...
