Mercedes-Benz GLK-Class: Driving systems
Cruise control
Important safety notes
Cruise control maintains a constant road speed for you. It brakes automatically in order to avoid exceeding the set speed. On long and steep downhill gradients, especially if the vehicle is laden or towing a trailer, you must select shift range 1, 2 or 3 in good time. By doing so, you will make use of the braking effect of the engine, which relieves the load on the brake system and prevents the brakes from overheating and wearing too quickly.
Use cruise control only if road and traffic conditions make it appropriate to maintain a steady speed for a prolonged period. You can set any road speed above 20 mph (30 km/h).
![]() WARNING
WARNING
The cruise control is a convenience system designed to assist the driver during vehicle operation. The driver is and must always remain responsible for the vehicle's speed and for safe brake operation.
Only use the cruise control if the road, traffic, and weather conditions make it advisable to travel at a constant speed.
RThe use of the cruise control can be dangerous on winding roads or in heavy traffic because conditions do not allow safe driving at a constant speed.
RThe use of the cruise control can be dangerous on slippery roads. Rapid changes in tire traction can result in wheel spin and loss of control.
RDeactivate the cruise control when driving in fog.
The "Resume" function should only be operated if the driver is fully aware of the previously set speed and wishes to resume this particular preset speed.
![]() WARNING
WARNING
The cruise control brakes automatically so that the set speed is not exceeded.
![]() Cruise control should not be activated during off-road driving.
Cruise control should not be activated during off-road driving.
Cruise control lever
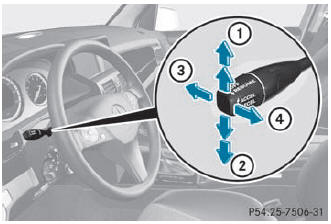
- To switch on or to increase the speed
- To switch on or to reduce the speed
- To deactivate cruise control
- To switch on with the current speed or with the last stored speed
When you activate cruise control, the stored speed is shown in the multifunction display for five seconds. In the multifunction display, the segments between the stored speed and the maximum speed light up.
Storing and maintaining the current speed
You can store the current speed if you are driving faster than 20 mph (30 km/h).
- Accelerate the vehicle to the desired speed.
- Briefly press the cruise control lever up 1 or down 2.
- Remove your foot from the accelerator pedal.
Cruise control is activated. The vehicle automatically maintains the speed.
![]() Cruise control may be unable to maintain the stored speed on uphill gradients.
The stored speed is resumed when the gradient evens out. Cruise control maintains
the stored speed on downhill gradients by automatically applying the brakes.
Cruise control may be unable to maintain the stored speed on uphill gradients.
The stored speed is resumed when the gradient evens out. Cruise control maintains
the stored speed on downhill gradients by automatically applying the brakes.
Storing the current speed or calling up the last stored speed
![]() WARNING
WARNING
The set speed stored in memory should only be set again if prevailing road conditions and legal speed limits permit. Possible acceleration or deceleration differences arising from returning to the preset speed could cause an accident and/or serious injury to you and others.
- Briefly pull the cruise control lever towards you ?.
- Remove your foot from the accelerator pedal.
The first time cruise control is activated, it stores the current speed or regulates the speed of the vehicle to the previously stored speed.
Setting a speed
![]() WARNING
WARNING
Keep in mind that it may take a brief moment until the vehicle has made the necessary adjustments.
Increase or decrease the set vehicle speed to a value that the prevailing road conditions and legal speed limits permit. Otherwise, sudden and unexpected acceleration or deceleration of the vehicle could cause an accident and/ or serious injury to you and others.
- Press the cruise control lever up 1 for a higher speed or down 2 for a lower speed.
- Keep the cruise control lever pressed until the desired speed is reached.
- Release the cruise control lever. The new speed is stored.
![]() Cruise control is not deactivated if you depress the accelerator pedal. For
example, if you accelerate briefly to overtake, cruise control adjusts the vehicle's
speed to the last speed stored after you have finished overtaking.
Cruise control is not deactivated if you depress the accelerator pedal. For
example, if you accelerate briefly to overtake, cruise control adjusts the vehicle's
speed to the last speed stored after you have finished overtaking.
Making adjustments in 1 mph (Canada: 1 km/h) increments
Briefly press the cruise control lever to the pressure point, up 1 for a higher speed or down 2 for a lower speed. The last speed stored is increased or reduced.
Making adjustments in 5 mph (Canada: 10 km/h) increments
Briefly press the cruise control lever beyond the pressure point, up 1 for a higher speed or down 2 for a lower speed. The last speed stored is increased or reduced.
Deactivating cruise control
There are several ways to deactivate cruise control:
- Briefly press the cruise control lever forwards 3.
or
- Brake.
Cruise control is automatically deactivated if:
- you depress the parking brake.
- you are driving below 20 mph (30 km/h).
- ESP® intervenes or you deactivate ESP®.
- you shift the transmission to position N while driving.
- If cruise control is deactivated, you will hear a warning tone. You will see the Cruise Control Off message in the multifunction display for approximately five seconds.
![]() The last speed stored is cleared when you switch off the engine.
The last speed stored is cleared when you switch off the engine.
4MATIC (permanent four-wheel drive)
4MATIC ensures that all four wheels are permanently driven. Together with ESP® and ETS, it improves the traction of your vehicle whenever a drive wheel spins due to insufficient grip.
![]() WARNING
WARNING
If a drive wheel is spinning due to insufficient traction:
- While driving off, apply as little throttle as possible.
- While driving, ease up on the accelerator pedal.
- Adapt your speed and driving style to the prevailing road conditions.
Failure to observe these guidelines could cause the vehicle to skid.
The 4MATIC cannot prevent accidents resulting from excessive speed.
![]() Never tow the vehicle with one axle raised. This may damage the transfer case.
Damage of this sort is not covered by the Mercedes-Benz Limited Warranty. All wheels
must remain either on the ground or be fully raised. Observe the instructions for
towing the vehicle with all wheels in full contact with the ground.
Never tow the vehicle with one axle raised. This may damage the transfer case.
Damage of this sort is not covered by the Mercedes-Benz Limited Warranty. All wheels
must remain either on the ground or be fully raised. Observe the instructions for
towing the vehicle with all wheels in full contact with the ground.
![]() In wintry driving conditions, the maximum effect of 4MATIC can only be achieved
if you use winter tires (M+S tires), with snow chains if necessary.
In wintry driving conditions, the maximum effect of 4MATIC can only be achieved
if you use winter tires (M+S tires), with snow chains if necessary.
![]() When testing the parking brake, operate the vehicle only briefly (for a maximum
of ten seconds) on a brake test dynamometer.
When testing the parking brake, operate the vehicle only briefly (for a maximum
of ten seconds) on a brake test dynamometer.
![]() When doing this, turn the SmartKey to position 0 or 1 in the ignition. Failure
to do this can cause damage to the drive train or the brake system.
When doing this, turn the SmartKey to position 0 or 1 in the ignition. Failure
to do this can cause damage to the drive train or the brake system.
![]() Function or performance tests may only be performed on a 2-axle dynamometer.
If you wish to operate the vehicle on such a dynamometer, please consult an authorized
Mercedes-Benz Center beforehand. You could otherwise damage the drive train or the
brake system.
Function or performance tests may only be performed on a 2-axle dynamometer.
If you wish to operate the vehicle on such a dynamometer, please consult an authorized
Mercedes-Benz Center beforehand. You could otherwise damage the drive train or the
brake system.
PARKTRONIC
Important safety notes
![]() WARNING
WARNING
The PARKTRONIC is a supplemental system. It is not intended to, nor does it replace, the need for extreme care. The responsibility during parking and other critical maneuvers always remains with the driver.
![]() WARNING
WARNING
Make sure no persons or animals are in or near the area in which you are parking/ maneuvering. Otherwise, they could be injured.
PARKTRONIC is an electronic parking aid with ultrasonic sensors. It indicates visually and audibly the distance between your vehicle and an object.
PARKTRONIC is activated automatically when you:
- switch on the ignition
- shift the transmission to position D, R or N
- release the parking brake
PARKTRONIC is deactivated at speeds above 11 mph (18 km/h). It is reactivated at lower speeds.
PARKTRONIC monitors the area around your vehicle using six sensors in the front bumper and four sensors in the rear bumper.
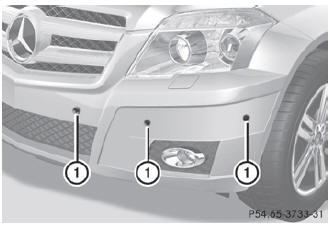
: Sensors in the front bumper, left-hand side (example)
Range of the sensors
General notes
The sensors must be free of dirt, ice and slush; otherwise they may not function correctly. Clean the sensors regularly, taking care not to scratch or damage them ().
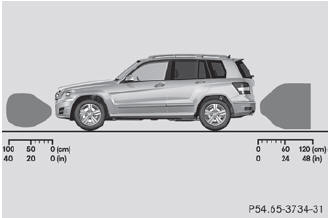
Side view
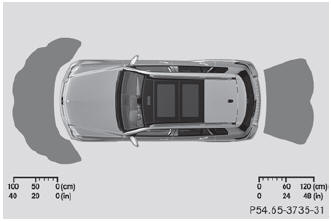
Top view
Front sensors
Rear sensors
![]() When parking, pay particular attention to objects above or below the sensors,
such as flower pots or trailer drawbars.
When parking, pay particular attention to objects above or below the sensors,
such as flower pots or trailer drawbars.
PARKTRONIC does not detect such objects when they are in the immediate vicinity of the vehicle. You could damage the vehicle or the objects.
The sensors may not detect snow and other objects that absorb ultrasonic waves. Ultrasonic sources such as an automatic car wash, the compressed-air brakes on a truck or a pneumatic drill could cause PARKTRONIC to malfunction. PARKTRONIC may not function correctly on uneven terrain.
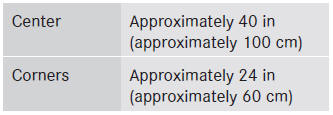
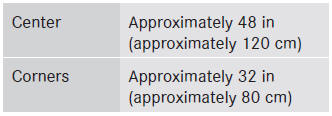
Minimum distance
If there is an obstacle within this range, the relevant warning displays light up and a warning tone sounds. If the distance falls below the minimum, the distance may no longer be shown.
Warning displays
The warning displays show the distance between the sensors and the obstacle. The warning display for the front area is located on the dashboard above the center air vents. The warning display for the rear area is located on the headliner in the rear compartment.
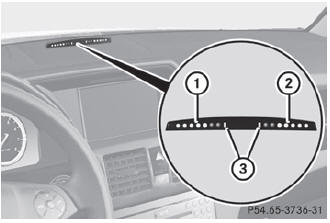
Warning display for the front area
- Segments on the left-hand side of the vehicle
- Segments on the right-hand side of the vehicle
- Segments showing operational readiness
The warning display for each side of the vehicle is divided into five yellow and two red segments. PARKTRONIC is operational if yellow segments showing operational readiness 3 light up.
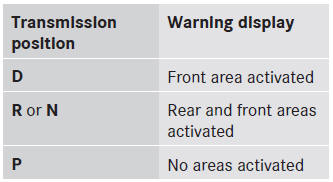
The selected transmission position determines which warning display is active when the engine is running.
One or more segments light up as the vehicle approaches an obstacle, depending on the vehicle's distance from the obstacle. From the:
- sixth segment onwards, you will hear an intermittent warning tone for approximately two seconds.
- seventh segment onwards, you will hear a warning tone for approximately two seconds. This indicates that you have now reached the minimum distance.
Deactivating/activating PARKTRONIC
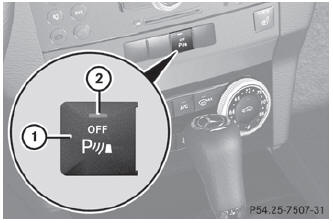
- To deactivate/activate PARKTRONIC
- Indicator lamp
If indicator lamp 2 lights up, PARKTRONIC is deactivated.
![]() PARKTRONIC is automatically activated when you turn the SmartKey to position
2 in the ignition lock.
PARKTRONIC is automatically activated when you turn the SmartKey to position
2 in the ignition lock.
Trailer towing
PARKTRONIC is deactivated for the rear area when you establish an electrical connection between your vehicle and a trailer.
![]() Fold in the ball coupling if the trailer tow hitch is not required. PARKTRONIC
measures the minimum detection range to an obstacle from the bumper, not the ball
coupling.
Fold in the ball coupling if the trailer tow hitch is not required. PARKTRONIC
measures the minimum detection range to an obstacle from the bumper, not the ball
coupling.
Problems with PARKTRONIC

Rear view camera
Important safety notes
The rear view camera is an optical parking aid. It shows the area behind your vehicle in the COMAND display.
![]() WARNING
WARNING
Make sure that no persons or animals are in the maneuvering range. Otherwise, they could be injured.
The rear view camera is located in the handle strip of the tailgate.
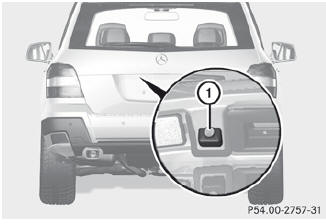
1 Rear view camera
View through the camera
The area behind the vehicle is displayed in a mirror-inverted manner, as in the rear-view mirror.
![]() WARNING
WARNING
The rear view camera is only an aid and may display obstacles
- from a distorted perspective
- inaccurately
- may not display obstacles at all
The rear view camera does not relieve you of the responsibility to be cautious. Take care and pay careful attention. The rear view camera may not show objects which are
- very close to the rear bumper
- under the rear bumper
- above the tailgate handle
You are responsible for safety at all times and must continue to pay attention to the immediate surroundings when parking and maneuvering. This includes the area behind, in front of, and beside the vehicle. Otherwise you could endanger yourself and/or others.
![]() WARNING
WARNING
The rear view camera will not function or will not fully function if:
- the tailgate is open
- it is raining or snowing strongly or if it is foggy
- it is night or if you are parking/ maneuvering your vehicle in a very dark area
- a very bright white light is affecting the camera
- the immediate vicinity is illuminated with fluorescent light (the display can flicker)
- temperature changes abruptly, for example if you drive out of the cold into a heated garage (condensation on the lens)
- the camera lens is dirty or covered
- the rear of your vehicle is damaged
In this case, have the position and the setting of the camera checked at a specialist workshop. Mercedes-Benz recommends that you consult a Mercedes- Benz Center for this purpose.
Do not use the rear view camera in these situations. You could otherwise injure yourself and other people and/or cause damage - including damage to your vehicle - while parking/maneuvering.
Activating the rear view camera
- Make sure that the SmartKey is in position 2 in the ignition lock.
- Make sure that the "rear view camera" function is selected in COMAND (see the separate operating instructions for COMAND).
- Engage reverse gear. The area behind the vehicle is shown in the COMAND display with guide lines.
Guide lines in the COMAND display
![]() WARNING
WARNING
Use of rear view camera can be dangerous if you are color-blind or have impaired color vision.
Only use rear view camera if you can see and distinguish all colored guidelines shown by rear view camera on the COMAND system display.
![]() WARNING
WARNING
Please note that objects that do not touch the ground may appear to be further away than they actually are, for example:
- the bumper of a vehicle parked behind you
- the trailer drawbar
- the ball coupling of a trailer tow hitch
- the rear end of a truck
- a slanted post
In such cases, you should not use the guide lines to judge the distance. You may misjudge the distance, which increases the risk of impacting the objects.
Even if the object you approach is directly on the ground, do not approach the object any closer than the red guide line.
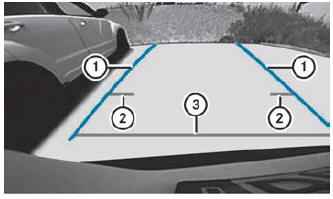
Information in the COMAND display (example)
Guide lines 2 and 3 show the approximate distance to the rear area. Yellow guide line 2 indicates a distance of approximately 3 ft (1 m) and red guide line 3 indicates a distance of approximately 10 in (0.25 m). The distances only apply to objects that are at ground level. Blue guide lines 1 depict the width required for the vehicle. They are used to align the vehicle with the edge of the road, e.g. the curb.
 Driving tips
See also:
Electronic compass (if equipped)
The compass heading is displayed in the center stack display.
The compass reading may be affected when you drive near large
buildings, bridges, power lines and powerful broadcast antenna. Magnetic
or metallic objects placed in, on or near the ve ...
Towing
If towing is necessary, it is best done by
your SUBARU dealer or a commercial
towing service. Observe the following
procedures for safety.
Never tow AWD models (both AT and
MT) with the front wheels raised off
the ground while the ...
